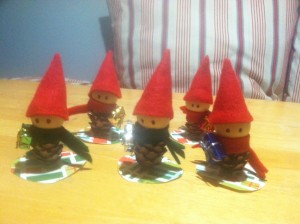
Make these Christmas elves for about $1 each!
I fell in love with the mini pinecone Christmas Elves for sale on Etsy – but not their price tag. One set of three is selling for as much as $34! Another set of five is selling for $45! Now, I’m not a professional crafter and my homemade Christmas ornaments are not perfect. But I think the money I’m saving makes up for any imperfections. Plus, these Christmas elves are fun to make!
Looking for homemade Christmas ornaments you can make? Here are 5 more easy Christmas ornaments to make. For Christmas wreaths and more DIY holiday crafts, see links below.
How to make mini pinecone Christmas elves for about $1 each!
What you will need:
- 12″ by 12″ piece of red felt
- 12″ x 12″ piece of green felt
- Five pinecones about 1.5″ high
- Five wooden doll heads measuring 1″ in diameter (doll heads have a slightly flattened edge as opposed to a wooden ball, which is completely round)
- 12″ x 12″ holiday-themed thick paper (for the base to stabilize your elves)
- Hot glue gun with glue sticks
- Black Sharpie to draw eyes
- Tiny gifts for the elves to carry
- Scissors to cut of the pinecone stem so the elves stands up straight
How much time it takes:
This project took me about an hour. If you make these elves in bulk and give them as gifts, you can make each part separately and then assemble them quickly. Many hands make light work!
Is this project suitable for children?
If your children are old enough to handle a hot glue gun – which really does make the glue burning hot – then yes. Otherwise, no. They will want to handle the glue gun and they will hurt themselves. I got hot glue on my fingers several times while making my set of five pinecone Christmas elves and it hurt.
Step by step directions to make mini pinecone Christmas elves.
1. Cut long green strips about 6 inches long from the green felt. These will be the elves’ scarves. Cut two small snips into each end of the scarf so it is a bit frayed. Set aside.
2. With your scissors, snip off the pinecone stem so the pinecone is a bit flatter. Set aside.
3. Cut out this party hat template out of red felt so it forms a hat about 2 inches high. I made a template out of paper, laid it flat on the red felt, traced it with a Sharpie, then cut it out. Test the template on a wooden doll head and trim until you’re happy with the shape. Apply hot glue to the vertical edge of the red felt and press it into the other vertical edge so it forms a cone-shaped hat. This is the hardest part of making mini pinecone elves.
4. Apply hot glue to the flat edge of the wooden doll head and lightly press it onto the tip of the pinecone. Wait 15 seconds. There may not be a lot to press it into, but hot glue it amazing and it will stick. Apply a few extra dabs of hot glue around the “neck” to reinforce. Count to 15 again, then lay down.
5. Decide which side of the pinecone you want to be the front. Apply hot glue to the middle two inches of the green felt scarf and quickly lay the pinecone doll head on the glued part, then wrap around. Secure the scarf with another dab of hot glue. You can make the scarf cross in front, or in back, which is what I did.
6. Apply hot glue to the edge of the red hat, then quickly set on the wooden doll head. Smush it down so the hat sits low on the head. It looks really cute if only the elf’s eyes are popping out between the red hat and the green scarf.
You’re almost done!
6. Grab your pen and draw on two eyes. Cut out a circle from your holiday-themed thick paper, about 3 inches in diameter. Now dab a dime-sized bit of hot glue into the center of the paper circle and lightly smash the elf into it. Wait 20 seconds.
Tip: This should be enough glue to hold up your pinecone elf, but if yours needs more, apply a round of hot glue to the base.
7. Apply one last dab of hot blue to the back of the teeny tiny gift, and stick it to the elf’s side.


These are a great idea! I don’t have kids yet but I look forward to doing arts and crafts like this when I do.
Wow, that’s a great deal. For just a dollar, who wouldn’t want to make these cute little things? Thank you for sharing!