Fall is my favorite time of year. Sometimes I forget how beautiful New England is..but never during fall. The bright leaves and perfect weather make living in Rhode Island during this season a real treat. These frugal crafts help to bring some fall flavor into your home – without throwing down a lot of money. Whether you’re enjoying a New England fall or sitting in sunny California, these fall crafts will have you in the holiday spirit in no time!
8 fun & simple fall craft projects
What’s great about these crafts is that many of them require the same tools. This means that you may not have to choose just one fall craft BUT will be able to use leftover products to create more fall fun. Sweet!

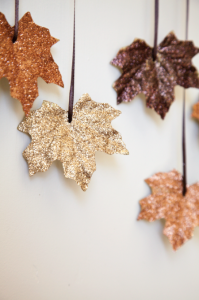
Photo Via Sixth Street Design School.
1. DIY Sparkle Leaf Garland –
What You’ll Need:
- Bag of Artificial Leaves (found at the Dollar Tree)
- Mod Podge Sparkle or Glossy (this makes glitter really stick!)
- Foam Brush
- Glitter in Varying Colors (I like the combo of yellow, orange, and brown)
- Hole Punch
- Ribbon
Directions:
1. Use the Foam Brush to apply the Mod Podge to each leaf and sprinkle on Glitter. Shake off excess and wait to dry.
2. After the first layer has dried repeat step one again.
3. To set the glitter top with another layer of Mod Podge. This really keeps the glitter in place and will make sure these leaves keep their sparkle!
4. Punch a hole in the top of each leaf and attach a ribbon. Do not not the ribbon yet.
5. Lastly, tie the leaves to a large ribbon strand to create your garland.
Note: If you’re looking to make this a faster project or don’t have Mod Podge on hand you can use Elmer’s glue. Simply apply one layer of glue, sprinkle with glitter, shake off excess and wait to dry. These leaves might not last as long but they will still look great!
2. Acorn Treat Holders -This simple project only requires three items: plastic Easter eggs, a glue gun, and twine. Simply hot glue the twine around the end of the Easter egg. Then, fill with candy or other treats. Fun! Find the full tutorial here.
3. Twine Pumpkins -For this craft all you’ll need is twine, glue, a cup, a cinnamon stick, and saran wrap. Just coat twine with glue, and wrap around a saran-wrap-covered cup. This will create a spiral that you can spread out into a pumpkin shape. Top with cinnamon stick stem and woolah! You’re done. For the step-by-step picture tutorial visit Simply Albany’s page!
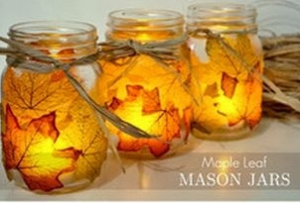
4. Leaf Mason Jars – I’ve been obsessed with mason jar crafts

Photo via Makezine.
What You’ll Need:
- Mason Jar
- Leaves (real or fake will work)
- Mod Podge
- Foam Brush
- Twine
- Tea Light Candles
Directions:
1. Use the sponge brush to apply a thin layer of mod podge to the jar.
2. Wait for the layer to become sticky, then place a leave on the jar.
3. Paint more mod podge on top of the leaf in thin layer and smooth out layers. Add layers of mod podge until the leaf sticks to the jar.
4. Repeat steps 1-3 with more leaves until the jar is fully covered. Then allow a few hours for jars to dry.
5. Finish the look by tying twine around the top of the mason jar and adding a tea light candle.
Note: This craft uses a classic dесoupаgе technique. The first time I attempted a craft like this I found this how to decoupage article very helpful.
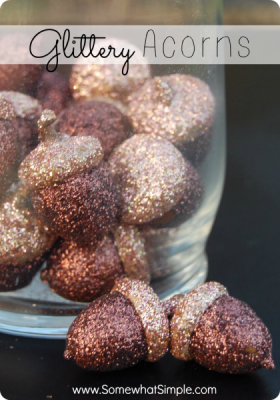
 5. Glitter Acorns – Creating glitter acorns is really simply! First you’ll want to separate the tops and bottoms of the acorns. This allows you to make sure each piece is fully covered. PLUS, you can use a different color glitter for the tops and bottoms which will make them look great! Then, just paint glue onto the acorns, sprinkle with glitter, and let dry. Hot glue the tops and bottoms back together AND you’re done. These would look great in a vase or around a centerpiece. Cute!
6. Sweater Weather Pumpkin – This is a great way to make use of an old sweater! All you need for this project is a pair of scissors, an old sweater, ribbon, stuffing (whatever you can find: newspapers, inside of an old pillow, rags etc) and a rubber band. Simply, cut out the body of the sweater, turn it inside out and gather one end with a rubber band. Turn it right side out, stuff it, and tie/fancy it up with some ribbon. Head here for step-by-step picture directions.

Photo via Craftaholics Anonymous.
7. Chalkboard Wood Slice
What You’ll Need:
- Chalkboard Paint
- Chalk
- Wood Slice (Found at Michaels, Craft Stores etc.)
- Foam Brush
Directions:
1. Paint two coats of chalkboard paint onto your wood slice and wait to dry. Then use chalk to decorate your new chalkboard wood slice!
8. DIY Leaf Pillows – Get a plain white pillow, black fabric paint, and some real leaves. Paint the leaves black and lay on the pillow. Using clean newsprint paper press down on the leave and smooth. Remove the sheet and leaf carefully to reveal your leaf print. Sweet! See the finished product here.
What’s your favorite fall craft?


I made similar leaf mason jars with my little guy a few years ago, and couldn’t believe how great they turned out. I’m going to try your DIY Sparkle Leaf Garland this weekend. Thanks for the idea!