Will you be gardening this year? Via Shutterstock.
Spring is right around the corner which means it’s time for flowers, farmer’s markets, and gardening! This year I’m planning on making my own raised bed garden so I’ve been doing TONS of research on different options.
Raised garden beds give you more flexibility about where you can plant different things so you can get creative. With different beds ranging everywhere from $10 to over $150 it can be hard to decide what choice to make BUT I’m here to help and answer all your raised garden bed questions!
What you need to know about raised garden beds
1. Where to Place Your Raised Garden
After you’ve picked out your materials the next step is mapping out where you will put your raised garden bed. As with your standard garden you’ll want to choose an area that is level and gets a fair amount of sun. Gardens usually need about 6-8 hours of sunlight so observe your yard for a few days to get a feel for the best spot…it would be a shame to spend so much time on a garden box where nothing can grow!
2. Choosing Building Materials
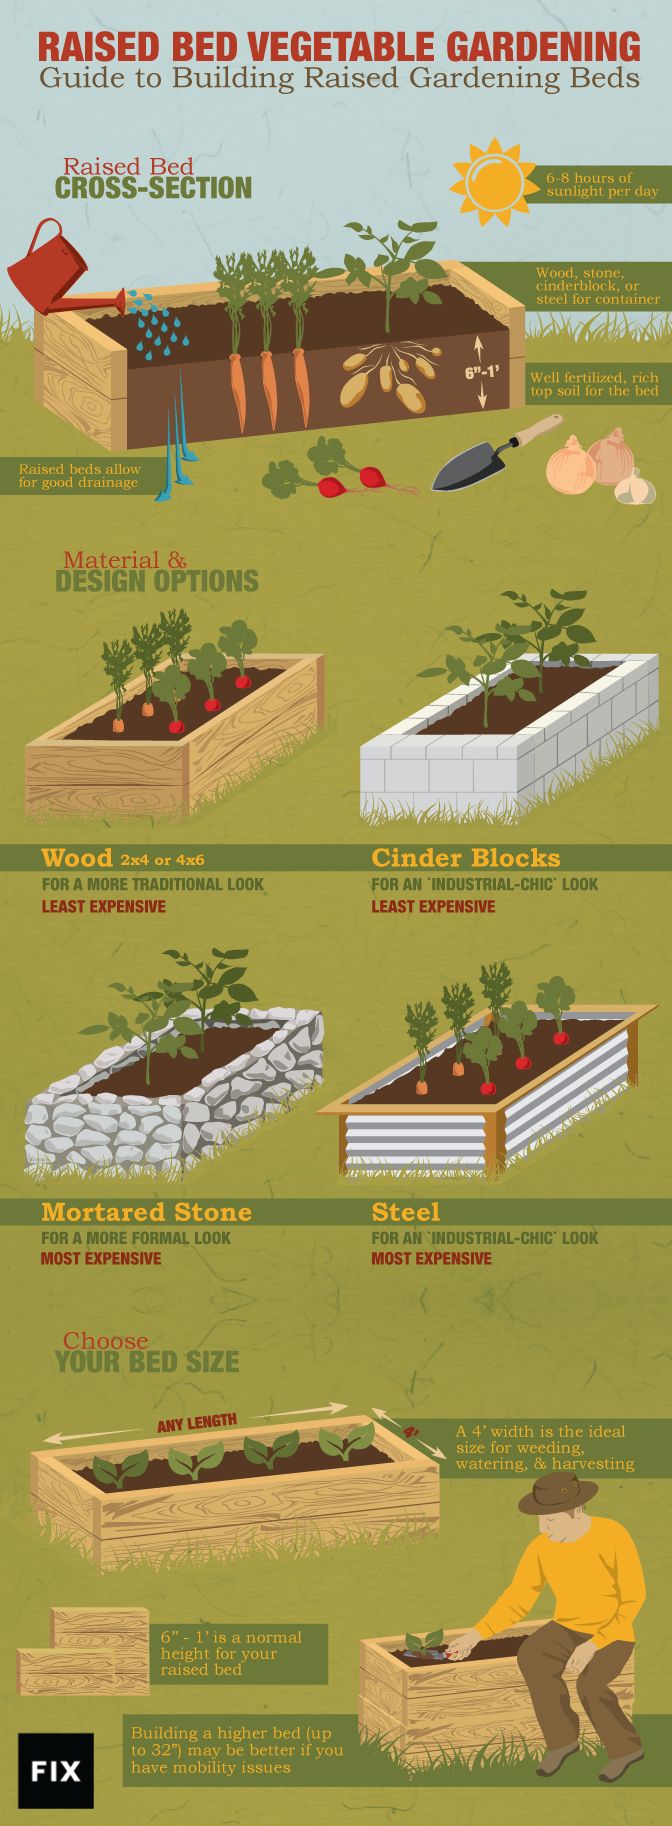
 You may think raised garden beds can be made only with wood but you’d be mistaken. There are TONS of tutorials using everything from wood to cinder blocks or steel. This material will most likely be the most expensive aspect of building your bed so you’ll want to make an informed choice. The infographic from Fix.com on the right shows the wide variety of materials that you can use to make a raised bed. Wood is usually the most common choice because it is the most inexpensive to use AND the tools you need to make this bed are usually found in your garage (basically just a drill!). Here are a few tutorials I found that offer price comparisons for wood raised beds vs. other materials.
Concrete Garden Bed – This tutorial explains that these around $175 to build BUT this cost is mostly in concrete blocks if you could snag a deal or use Craigslist it could be cheaper.
Wood Garden Bed – The type of wood you use will also determine your cost. Ana White’s tutorial uses cedar boards for just $10 while Homestead and Prepper’s tutorial uses Kiln-Dried Southern Yellow Pine Lumber to make beds under $20. The type of would you choose will effect how your bed looks so keep this in mind.
Brick Raised Bed – This raised bed tutorial was also very expensive with a cost of materials at $100 and seemed to be the most time consuming.
Big Bag Raised Bed – Not that into DIY then this option is great for you! To set up this Smart Pots Big Bag Bed Fabric Raised Bed you just unfold, fill, and grow. It’s a little more expensive then DIY wood options at $35.90 (and a little less pretty) but the ease of set up makes this worth mentioning.
DIY Raised Bed Kit – If you’re a little intimated by all the DIY work but still want that wood finished look this raised garden bed kit from Home Depot is a great option and it’s only $28.97. It will require a little work but it will be easier than making your own from scratch.
For this tutorial we will be focusing on wood because it is the most inexpensive and one of the most popular options…if you try out others let us know!
3. Choosing Your Bed Size
Now that you’ve picked out your spot you’ll want to build your bed and choosing your bed size is an important first step. As the above infographic shows an average raised bed has a 4″ width and a 6″ to 1′ height. Depending on your preference (and how much you want to spend on materials you can make your bed as large or small as you want. Just keep in mind how much you want to plant etc.
Tip – Don’t have wood cutting tools at home? Check with where you’re buying your lumber and see if they can cut it for you. Home Depot will cut your wood for FREE which will save you time and save you money on tools.
4. Making Your Bed
Now it’s time for the good stuff…. actually making your bed. I searched through various projects and descriptions for making a raised bed and the Pioneer Woman’s raised bed tutorial was the best I’ve found as it required the least amount of materials and tools. Here is a quick description of the project. For this project you’ll need:
Building Supplies
1. Wood – Your choice but cedar and pine are common choices
4 – 2 x 6 boards @ 8 feet long.
4 – 2 x 6 boards @ 4 feet long.
2. Exterior Screws – You want to use exterior screws so they don’t rush
1# 3 – 3 1/2 exterior screws
1# 2 – 2 1/2 exterior screws
1 bundle 18″ – 24″ stakes
Tools
- Tape measure
- Pencil
- Level
- Small sledge hammer
- Carpenter’s square
- Cordless drill
- 7/64 #8 counter sink bit
Instructions
1. Set the first side and attach with large screws.
2. Attach ends on second side with large screws and square and level firstt side.
3. Drive Stakes into the corners and attach stakes to boards with small screws.
4. Do the same with the next side…attach ends, square/level, and drive stakes into the ground.
5. Add more stakes inside the box with about 4 inches above the boards and attach the stakes with small screws.
6. Make the second upper layer of the boards and then attach the boards to the stakes
Woo-Lah you’re done! If these steps leave you a little confused or wanting more, then you’ll want to head to the Pioneer Woman’s build your own raised flowerbed tutorial which the steps above are based on. This is by far the best tutorial I found for those looking for complete step-by-step instructions (with pictures!). She shows each step, so you can be sure with what you’re doing and makes it seem doable for everyone. Sweet!


I’m a 62 yr old woman,built my own,8 raised beds,made with pallets,lumber,corrugated metal,by myself,no help,no experience