
Check out these inexpensive and easy holiday crafts! Via Shutterstock.
Every year my best friend’s Mom has a huge party the Saturday following Thanksgiving. Not only does she make some of a huge amount of food (there were 15 different appetizers this year!) but she also sets up a holiday craft table that I end up showcasing on my tree or in my living room.
The best part is that all of these holiday crafts can be made for under $5!
Here is how to make a snowman, a button tree and ornament, and a seashell tree for about $5 each.
Do you make homemade decorations?
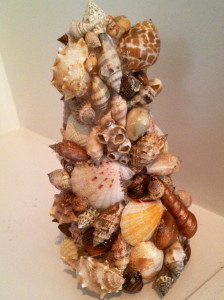
Seashell Tree
What You’ll Need:
1 Glue Gun – You can score a glue gun if you don’t have one for only $2.77 on Amazon. In my opinion, this is a great investment for crafting. You can use it for so many projects! For this seashell tree you really need the hot glue if you want it to last through more than one holiday. With regular glue the shells tend to fall off…or get pulled off by curious kids. Make sure to buy extra glue. The sticks go quickly.
Bag of SeaShells – For this we usually collect shells at the beach for the best price of all FREE! If you don’t live near the beach or don’t feel like spending time collecting shells you can buy a bag of 500 mixed beach shells on Ebay for just $1.59! If you want to go pricier you can pick out all different kinds of shells at Michael’s or on Amazon. I have to admit I love the mini starfish but they’re $4.00 a pack! That’s why I like to find them hiding on the beach.
Styrofoam Tree Base – The Styrofoam is tricky and how many you buy can really decrease the price. If you’re making just one a good idea is to buy a smaller tree base. Plus, gluing on those shells can get a little tedious after a while! The cheapest tree base I found was a 6 x 3 base and cost only $1.28! That’s the exact size of my tree. If you’re looking to make a bigger tree or more than one I’d suggest going to Michael’s and buying a bulk package. Usually you can grab a package of 10 for less than a $1 each especially after the holidays when there are tons of sales!
What to do:
Now that you have all your supplies it’s time to get gluing! Just heat up your hot glue gun and then outline the shells in glue and stick on to the styrofoam base. Just keep doing this and arranging the shells in an interesting pattern. Try to get them as close to each other as possible so that the styrofoam doesn’t poke through. After about an hour your tree should be done!
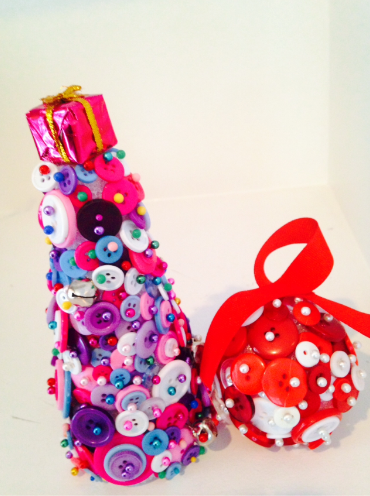
Button Ornament and Tree
What You’ll Need:
Glue Gun – You’ll only need a glue gun for the top decoration but if you don’t have one you can save money by using super glue or just pinning it!
Buttons – You’re going to need a lot of buttons and unlike shells they’re a little harder to collect than a day spent of the beach. You can grab grab a 1 pound bag of buttons for $3.73 that should be more than enough for both ornaments.
Pins – For this you will need straight head pins. If you’re feeling fancy you can get colored pins! You can score 480 pins for $3.02 on Amazon. You can use different colors, or the same it’s up to you!
Styrofoam Tree Base and Round Ball – You can find the tree base listed above. Styrofoam balls tend to be cheaper. You can score one 3” ball like my ornament for just 88 cents. You can usually score a variety pack of 10 for under $5 which would make the balls about 50 cents each!
Ribbon: You will need ribbon to tie to the ornament. You can grab 18 ft for $1.80 and you will have tons left over for future products. The amount you would actually use for this ornament would probably only amount to around 5 cents!
Top Decoration: For the top decoration of the tree you can choose a variety of object such as pompoms or a decorative bag as I have. You can usually score a 100 pompoms for under $2 at walmart. Making each pom pom only cost around 2 cents! Decorative bags are a little pricier at 1.99 for 9 boxes. Around 20 cents per box.
What to do:
This one is even easier than the seashell. You simply take the buttons and pin them to the styrofoam. I liked to stack some of the little buttons on top of the bigger buttons to make a more textured look. Also, don’t be afraid to overlap! The closer you get the buttons the less styrofoam you will see and the better they will look!
The final step for the tree and button ornaments aren’t all that different. For the tree, simply glue the present or pom pom to the top. For the ornament take a small piece of ribbon and make a loop (big enough for hanging). Then, glue the ribbon together and to the ornament!
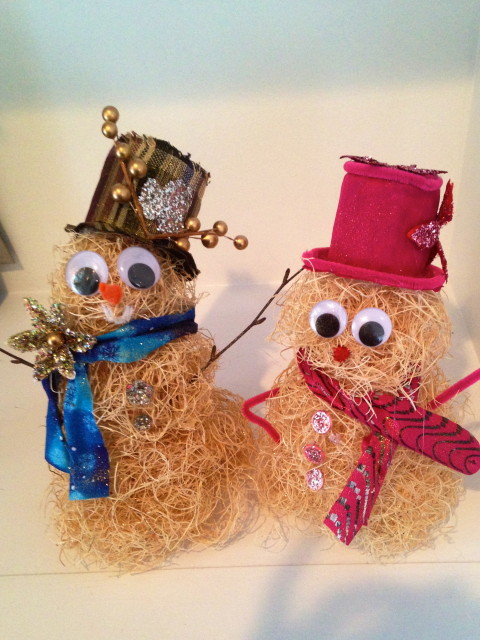
Straw Snowman
What You Need:
Glue Gun – You can use super glue but the glue gun will work best!
Googly Eyes – You will need one pair of googly eyes. You can buy these at the Dollar Store. I LOVE googly eyes but I know some people think they’re creepy so if you feel that way you can use buttons or pompoms for eyes!
Twigs or Pipe Cleaners- For arms I used twigs that we found in the yard but if this doesn’t appeal to you you can use pipe cleaners! You can also score pipe cleaners to use for the mouth and arms or your snowman for $1 at the dollar store.
Straw – Just grab a bag of straw from your local craft supply store. Usually you can find them for $3 or less.
Felt or PomPoms – You just need a tiny bit of felt to make a nose for your snowman. If you have an orange button you can use that or a colorful pompom the way my sister did. Felt can also be found at the Dollar Store. If you do’t feel like buying ribbon or fabric you can also use this for your
Plastic Water Bottle – You will cut this up to make your snowman’s hat! I just save one that I’ve bought perviously to use. You can also use the bottom of a soda can as well!
Fabric, Ribbon, or Wrapping Paper – If you decide to make the button ornaments you can use the leftover ribbon. I have scraps of fabric lying around the house that we use. You can also use wrapping paper that you’ve accumulated. This is what you will wrap your plastic bottle in to make a hat! I would use whatever is lying around the house.
Cardboard, Glue, and Glitter – If you want to make decorations for your snowman like I did, you can cut out shapes from cardboard and cover them in glue and glitter. You can score glue and glitter for a $1 each at the Dollar Store or you can grab a big container of multi-colored glitter for $2.49. The cardboard I just take from old boxes around my house.
What To Do:
First, separate the straw into three piles: small, medium and large. Then, take the straw and glue. Warning! This will make your hands messy. Use the glue to stick the straw together and form three balls. Make sure you let sit until dry. This is usually around 10 minutes as you don’t need that much glue. Lastly for the body, you take a your hot glue gun (or regular glue if you don’t have one) and glue the balls one on top of each other. Now is also the time to make any glitter cardboard shapes. Just cut out whatever you like and cover in glue. Then sprinkle glitter. I like to do this over a plate so I can save the extra glitter! Last, let dry.
Now comes the fun part…decorating your snowman! Glue the eyes and arms to your snowman. You can also you pompoms or real buttons for the snowman’s buttons. I like to add sparkle to my buttons…because I just love sparkle everything. Next take your twigs or pipe cleaners and stick them into the straw. Then, glue to part where the stick/pipe cleaner first stick out to the snowman’s body. Grab a piece of felt and cut it into a little nose or glue on a pom pom. I like to twist a pipe cleaner to form a little smile for the mouth but you can use whatever you like!
Lastly, it’s time for your snowman’s accessories. Take the ribbon or fabric and wrap it around the end of the first and top of the second ball. Glue in place so it looks like a scarf with two little pieces dangling. Now it’s time for you hat. Take the water bottle or can and cut the bottom. You really just cut it to be as small or big as you’d like the hat. Then glue the edges of your fabric or ribbon so the bottle is completely covered. If using fabric you can cut a round circles to cover the top and a larger circle to make the rib of your hat. If using ribbon just layer to cover the hat and use pipe cleaners as a border! Add your glitter decorations wherever you like and you’re done!
The snowman is the hardest to make but it is by far my favorite decoration!
Do you have a favorite homemade ornament or decoration?


Leave a Reply